Injuries to the rotator cuff tendons in the shoulder can significantly impair the ability to lift the arm away from the body, causing pain and difficulty in performing daily tasks.
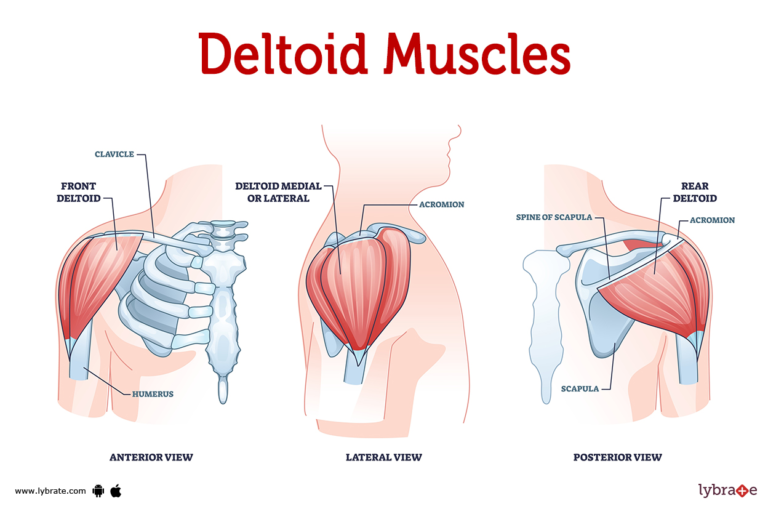
When these tendons are severely torn, the anterior deltoid muscle steps in to compensate for the loss of function.
This muscle plays a crucial role in lifting the arm and can be trained to alleviate discomfort and restore functionality.
The following exercises are specifically designed to target and strengthen the anterior deltoid muscle, aiming to improve arm mobility and reduce pain associated with rotator cuff injuries.
Starting with simple movements and progressing to more challenging exercises, this program is tailored to gradually enhance muscle strength over time.
Consistency is key, and it is recommended to adhere to this exercise regimen for a minimum of three months, performing the exercises three to five times daily.
While these exercises are generally safe, it’s essential to consult with a physiotherapist or doctor to ensure proper technique and address any concerns.
These exercises are part of a comprehensive approach to shoulder rehabilitation, aimed at empowering individuals to regain strength and mobility for improved quality of life.
Exercise number 1
Most of these exercises begin with lying on your back. This position is chosen to minimise the resistance against gravity, facilitating the movements. It may take a considerable period to notice the positive effects of these exercises, and we strongly advise continuing them for a minimum of three months.
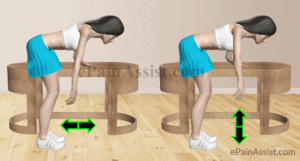
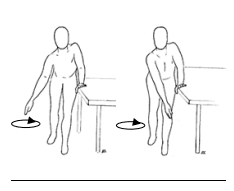
Pendular Exercises The pendular exercises shown below can be done as a warm up.

• Bend forward, using your unaffected arm for support.
• Perform 20 circular motions with your affected arm.
• Follow with 20 repetitions of backward and forward movements.
• Then, execute 20 side-to-side motions with your affected arm.
• Complete four sets of these exercise

Stage 1:
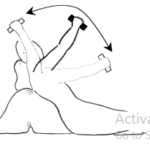
- Lie flat on your back,
- bend the elbow of your
- affected arm, then lift your
- arm towards the ceiling. If unable,
- use your stronger arm to assist, if needed

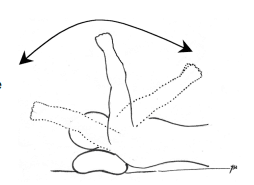
Stage 2:
- Maintain the arm in an upright position using its own strength.
- Gradually move the arm back and forth, ensuring the elbow remains straight, as depicted in the diagram.
- Maintain smooth and continuous movement for 5 minutes.
- Begin with a very small range of motion and gradually increase as the exercise becomes more manageable.
Stage 3
As you gain confidence, extend the range of motion, aiming to lower your arm by your side and raise it towards the wall above your head.
Stage 4

As you become more confident in managing your shoulder movement, you can introduce a light weight (less than 1 kg) to be held in the affected hand. Once you can effectively control the shoulder while lying down with the weight, you can progress to the next stage
Stage 5
Perform this exercise while sitting up halfway, using pillows to support your upper body if needed. Begin without weight; once you can do this comfortably, you can add weight
Stage 6
Once you have mastered the exercise without weight, gradually introduce a light weight as you become capable. Improvement in shoulder movement and strength is typically observed within three months of starting these exercises.
Exercise number 2
Here’s another beneficial exercise to retrain the concentric contraction of the deltoid muscle.
To perform the exercise:

- Make a fist with the hand on the affected side.
- Use the flat hand of the opposite side to provide resistance.
- Push your affected hand against the resistance from the other hand.
- While doing this, you’ll notice that you can fully elevate your arm above your head.
Repeat these exercises to teach and retrain your deltoid muscle to perform this concentric contraction even without pushing against your other arm.
Exercise number 3
Level one
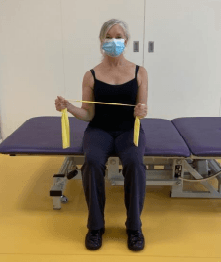
- Sit with your elbows bent at a 90-degree angle and close to your sides.
- Grasp a yellow resistance band with both hands.
- Extend your unaffected arm from your body,
- then slowly return to the starting position.

Level two
- Sit with your elbows bent at a 90-degree angle and resting against your sides.
- Grasp a yellow resistance band with both hands.
- Extend your affected arm outward away from your body, then slowly return to the starting position, repeating this movement five times.
Level three
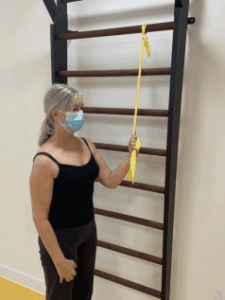
- Fasten one end of a long yellow resistance band to a stable object placed above head level, like a bannister or door hook.
- Hold onto the resistance band with your arm raised to shoulder height and your elbow bent at a 90-degree angle.
- Pull your arm downwards towards your side while maintaining the bend in your elbow.
- Gradually release the tension and revert to the initial position.

