Clubfoot typically does not cause pain during infancy. However, if left untreated, the condition can result in a permanent foot deformity, significantly affecting your child’s ability to walk normally. With timely and appropriate treatment, most children can engage in various physical activities, often with minimal or no signs of the condition.
The majority of clubfoot cases are effectively managed through nonsurgical methods, including a combination of gentle stretching, casting, and bracing. These treatments usually commence shortly after birth to maximize their effectiveness and ensure the best outcomes.
Description
Clubfoot is characterized by short and tight tendons connecting the leg muscles to the foot bones, causing the foot to twist inward. While this condition is typically diagnosed at birth, many cases are detected earlier during a prenatal ultrasound. Approximately half of all children with clubfoot have both feet affected, and the condition is observed twice as frequently in boys as in girls.
Appearance
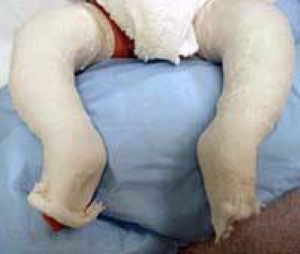
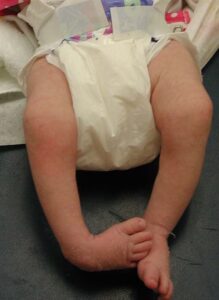
The severity of clubfoot can vary, but it usually presents with a similar appearance. The foot is twisted inward, and there is often a noticeable deep crease on the sole. Affected limbs are slightly shorter than normal, with a thinner calf due to underdeveloped muscles. These differences are particularly pronounced in cases where only one side is affected
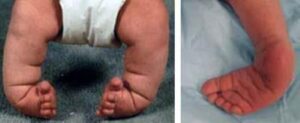 (Left) A child with clubfoot in both feet (called bilateral). (Right) Note the deep crease on the bottom of the foot in this child with a unilateral (present on only one side) clubfoot.
Classification
Clubfoot is generally categorized into two main types:
- Isolated (Idiopathic) Clubfoot
This is the most common form of the condition and occurs in children without any associated medical issues. - Non-Isolated Clubfoot
This type occurs alongside other health conditions or neuromuscular disorders, such as arthrogryposis or spina bifida. When clubfoot is associated with a neuromuscular condition, it:- May be more challenging to treat
- Requires a longer duration of nonsurgical interventions
- Might necessitate multiple surgical procedures
Untreated Clubfoot
Without treatment, clubfoot does not improve and can lead to significant complications. A child with untreated clubfoot may:
- Walk on the outer edge of the foot instead of the sole
- Develop painful calluses
- Struggle to wear shoes
- Experience chronic foot pain that severely restricts daily activities
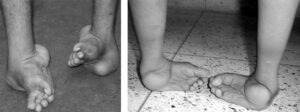 Clubfoot that is not treated causes serious disability as a child grows.
Cause
The exact cause of clubfoot remains unclear, but researchers widely believe it results from a combination of genetic predisposition and environmental influences. Evidence shows that the risk of developing clubfoot increases in families with a history of the condition, suggesting a hereditary component.
Treatment
The primary goal of clubfoot treatment is to achieve a functional, pain-free foot that allows the child to stand and walk with the sole flat on the ground.
Nonsurgical Treatment
For all levels of severity, the initial approach to treating clubfoot is nonsurgical.
- Ponseti Method: This globally recognized technique involves the use of gentle stretching and casting to gradually correct the deformity. The Ponseti method is the most widely practiced approach in North America and worldwide due to its high success rates and effectiveness in achieving long-term correction.
In the Ponseti method, long-leg casts are applied after the feet are correctly positioned.
Treatment Timeline and Techniques
Early intervention is ideal for clubfoot treatment, with the Ponseti method yielding the best results when started shortly after birth. However, older infants have also responded successfully to this approach. The Ponseti method consists of several key steps:
- Manipulation and Casting:
The baby’s foot is gently stretched and repositioned into a more corrected alignment, then secured with a long-leg cast (extending from the toes to the thigh). This process is repeated weekly, with each session involving stretching, repositioning, and re-casting. Most infants achieve significant improvement within 6 to 8 weeks. - Achilles Tenotomy:
After the initial casting phase, about 90% of infants require a minor procedure to address residual tightness in the Achilles tendon (heel cord). This procedure, known as a tenotomy, involves using a very fine instrument to make a small cut in the tendon, which promotes elongation. The procedure is quick, does not require stitches, and is followed by the application of a new cast to support the healing tendon. Over approximately 3 weeks, the tendon regrows to an appropriate length, completing the correction of the clubfoot.
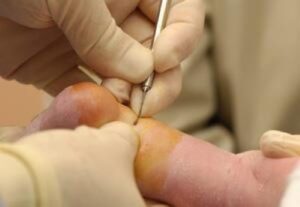 In Achilles tenotomy, the doctor uses a very small instrument to cut the heel cord.
Bracing: Maintaining the Correction
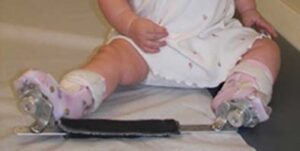
Even after successful correction with casting, clubfeet have a natural tendency to recur. To ensure the foot remains in the correct position, your baby will need to wear a brace, commonly referred to as “boots and bar,” for several years. This brace holds the foot at the proper angle to preserve the correction.
For the first three months, the brace is worn nearly full-time—about 23 hours a day. Over time, your child’s doctor will gradually reduce the required wearing time until the brace is only needed during sleep, including overnight and nap time, totaling approximately 12 to 14 hours daily. While this long-term bracing program can be challenging for parents and families, it is essential to follow it for at least 3 to 4 years to prevent the clubfoot from recurring.
Several types of braces are available, all of which include shoes, sandals, or custom-made footwear attached to a bar. The bar may be solid, which moves both legs together, or dynamic, allowing each leg to move independently. Your child’s doctor will recommend the most suitable type of brace based on your baby’s specific needs.
Considerations for the Ponseti Method
The Ponseti method has been highly effective for correcting clubfoot in many children. However, its success relies heavily on the family’s commitment to consistently following the bracing regimen. If the brace is not worn as prescribed, the risk of recurrence is significantly increased.
In some cases, even with proper bracing, a small percentage of children may experience a relapse. A common early sign of recurrence is the foot frequently slipping out of the brace. If this occurs, prompt intervention—typically involving a few additional serial casts and, in some cases, a minor surgical procedure—can effectively address the issue.
Successful application of the Ponseti method also depends on the training, experience, and expertise of the healthcare provider. To ensure the best outcome for your child, consult your pediatrician for a referral to an orthopedic surgeon skilled in nonsurgical clubfoot correction.
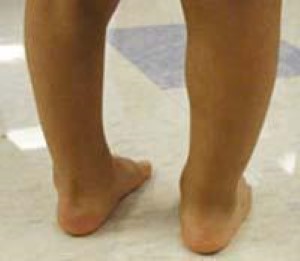 A patient after correction of a left-sided clubfoot deformity with the Ponseti cast method. Note that the calf is slightly smaller on the left side compared to the normal right leg.
French Method: A Physical Therapy Approach
The French method, also known as the functional or physical therapy method, is another nonsurgical technique used to correct clubfoot. This method relies on specialized stretching, mobilization, and taping performed under the guidance of a trained physical therapist.
Like the Ponseti method, the French method is most effective when started shortly after birth and requires active family involvement. Daily sessions involve stretching and manipulating the baby’s foot to improve its position, followed by taping to maintain the corrected range of motion. A plastic splint is then placed over the tape for additional support.
Families typically visit the physical therapist about three times a week, and the therapist trains parents to perform the daily regimen at home. By the end of three months, most babies show significant improvement, and therapy sessions become less frequent. Similar to the Ponseti method, many infants treated with the French method require an Achilles tenotomy to improve ankle dorsiflexion, enabling the foot to bend effectively upward.
To prevent recurrence, parents must continue the daily stretching, taping, and splinting routine until the child is 2 to 3 years old.
Surgical Treatment for Clubfoot
While most cases of clubfoot are successfully managed with nonsurgical methods, surgery may be required if the deformity cannot be fully corrected or if it recurs. This may happen due to challenges in following the treatment program or in cases of severe deformities that do not respond to stretching. Surgical intervention involves adjusting the tendons, ligaments, and joints in the foot and ankle.
Efforts are made to avoid surgery whenever possible because it can lead to a stiffer foot as the child grows. Even in cases of severe deformities or clubfoot associated with neuromuscular conditions, nonsurgical methods can often achieve partial correction, reducing the extent of surgery required.
- Less Extensive Surgery: Focuses on specific tendons and joints contributing to the deformity. Common procedures include releasing the Achilles tendon or performing an anterior tibial tendon transfer, which repositions the tendon from the front of the ankle to the inside of the midfoot.
- Major Reconstructive Surgery: Involves extensive soft tissue release, targeting multiple tendons and ligaments in the foot. After achieving correction, the foot’s joints are stabilized using pins and a long-leg cast while the tissues heal.
After 4 to 6 weeks, the pins and long-leg cast are removed, and a short-leg cast is applied for an additional 4 weeks. Post-surgery, braces or specialized shoes may be needed for up to a year or longer to prevent the muscles from reverting to the clubfoot position.
Complications from extensive surgery include overcorrection, stiffness, and pain.
Outcomes of Clubfoot Treatment
Clubfoot does not improve without treatment. With proper intervention, your child can achieve a nearly normal foot, allowing them to run, play, and wear regular shoes.
However, some long-term differences may remain:
- The affected foot is usually 1 to 1.5 sizes smaller and less flexible than the unaffected foot.
- The calf muscle in the affected leg may remain smaller, and children might experience leg fatigue or soreness more quickly than their peers.
- The affected leg may also be slightly shorter, though this rarely causes significant issues.
With the right treatment and care, children with clubfoot can lead active, healthy lives.
Helpful Tips for Bracewear
Engage Your Child During Bracewear
Playing with your child while they are wearing the brace can help reduce irritability and encourage adaptation. For children with a solid bar, encourage leg movement by gently pushing and pulling on the bar to bend and straighten their knees. If your child uses a dynamic bar, assist them by carefully moving their legs up and down as they adjust to the brace. These interactions can make brace time feel more natural and less restrictive.
Establish a Routine
Consistency is key to successful bracewear. Develop a fixed routine where the brace is always worn during sleep times, such as naps and bedtime. By associating the brace with the “sleeping spot,” your child will learn to expect it as part of their daily routine, reducing resistance and fussiness over time.
Pad the Bar for Safety
To protect your child, yourself, and your furniture from the metal bar, consider adding padding. A bicycle handlebar pad works well for this purpose, making the brace safer and more comfortable to handle.
Avoid Using Lotion on the Skin
Avoid applying lotion to your child’s feet, as it can worsen skin irritation. Some redness is normal, but bright red spots or blisters—particularly on the back of the heel—may indicate that the heel is slipping inside the brace. To prevent this, ensure the heel stays securely in place by properly tightening the straps or buckles. Regularly check your child’s feet, especially in the initial days of bracing, to catch and address any potential blisters early.
Prevent Escapes from the Brace
If your child frequently escapes from the brace, the following tips can help:
- Tighten Straps: For boots or sandals with a single strap, tighten it by one extra hole while holding the foot and tongue securely in place with your thumb. For boots with multiple straps, start by tightening the middle strap first.
- Double Socks: Use two socks—one directly on the foot and another over the boot insert—to minimize extra space.
- Remove the Tongue: In some cases, removing the tongue of the shoe can help achieve a better fit without causing harm.
- Reverse Lacing: Lace the shoes from top to bottom so the bow is near the toes.
- Longer Laces: Use 40-inch round shoelaces for a more secure fit.
- Sock Adjustments: Experiment with thinner or thicker cotton socks or try socks with non-slip soles for better grip inside the boot.
With consistent application and proper adjustments, these strategies can help ensure that the brace stays in place, allowing your child to benefit fully from the treatment.

